
Installing AMD eGPU under Windows 10 on Mac Pro 6,1 (2013)
Connect your eGPU to the Mac Pro 6,1 (2013), but do not connect any displays to it yet. Use built-in HDMI port inside Mac Pro to connect the display for the installation.
Please note you cannot hotplug eGPU under Windows in Mac Pro 6,1 (2013). In order for the eGPU to be seen you need to plug it before starting the computer.
Also when there is eGPU connected (or any other Thunderbolt 2 device) sleep and resume modes are disabled.
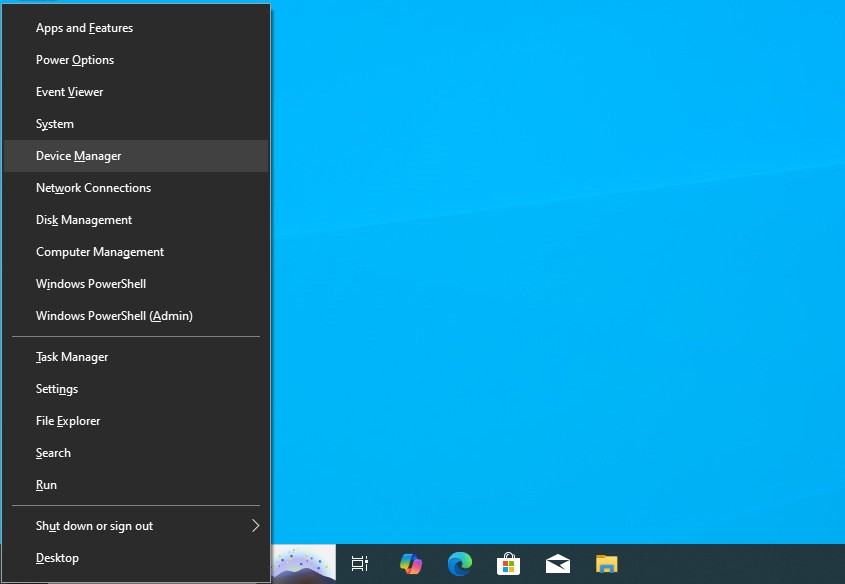
Step 1Press Option key (or Windows key) + X and choose Device Manager from the list. |
 |
|
|
|
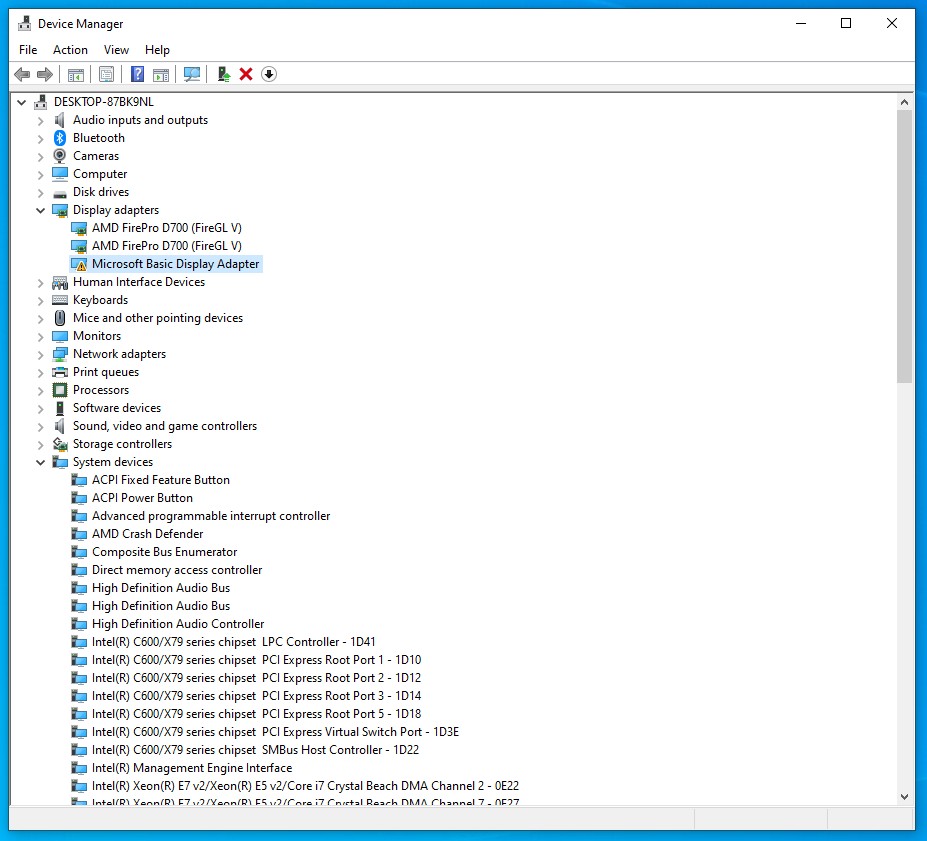
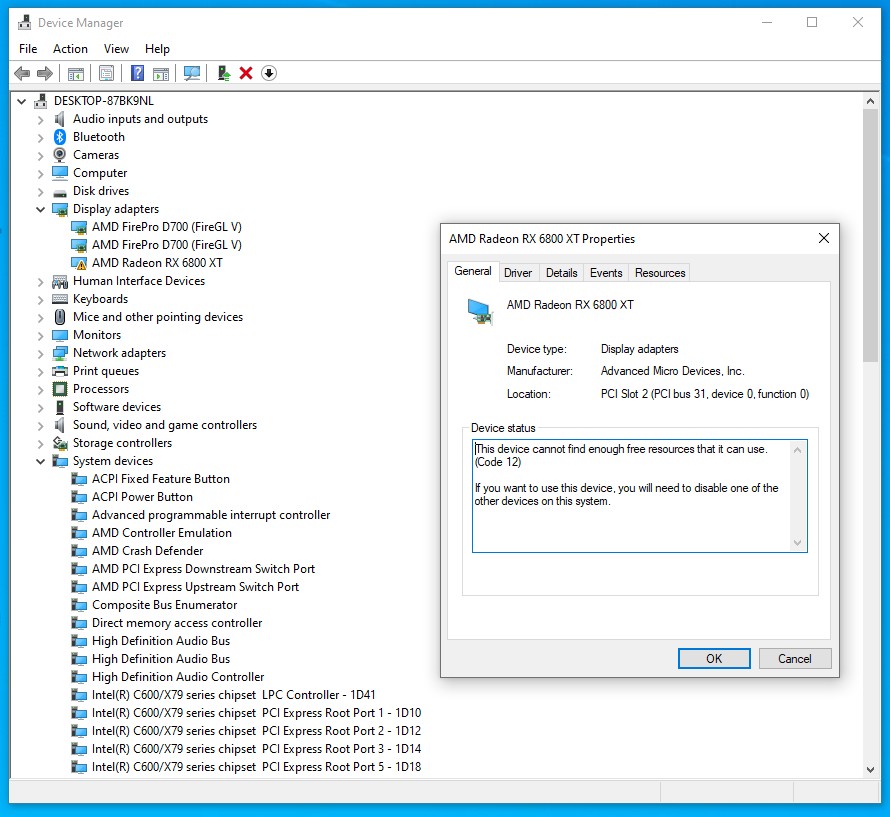
Step 2Scroll down the window to the bottom of the devices list.
You will notice one of PCI-to-PCI Bridges is having an exclamation mark and that your eGPU card is not yet visible in Display adapters.
It's because Mac Pro 2013 does not have enough resources to run eGPU in a default configuration. We need to disable some unused PCI-to-PCI bridges first and install proper display drivers.
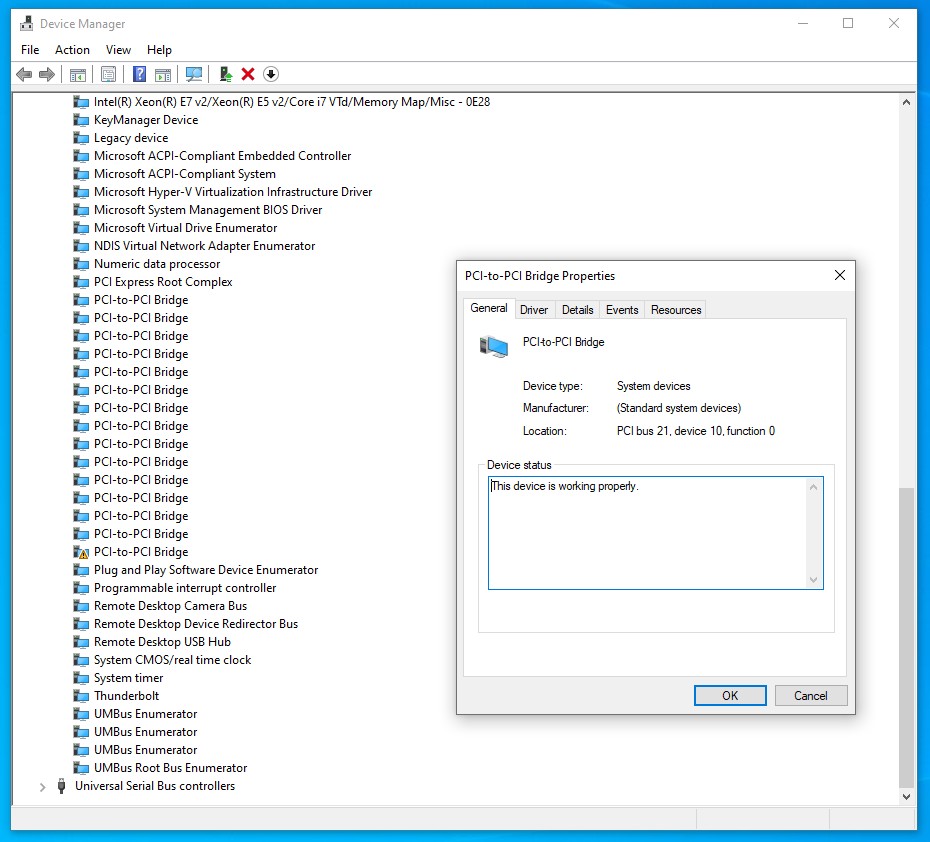
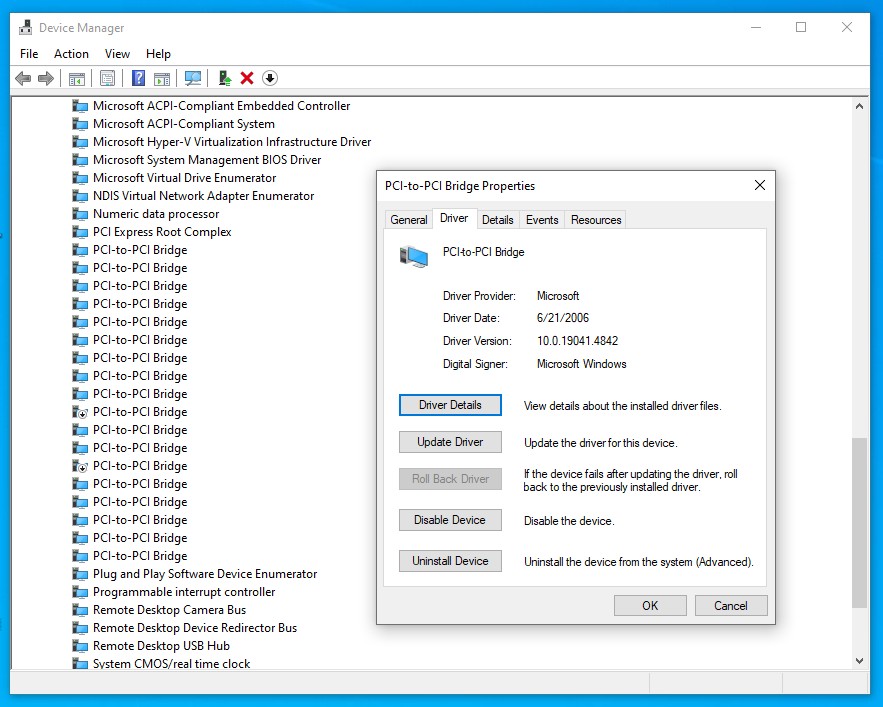
Double click on every PCI-to-PCI bridges and look for PCI-to-PCI Bridge with Location: PCI bus 21, device 10, function 0. |
 |
|
|
|
Step 3Click Driver tab and then Disable Device button to disable it. You will notice a new hardware popup will be shown. |
 |
|
|
|
Step 4Click Yes button to confirm disabling the device. |
 |
|
|
|
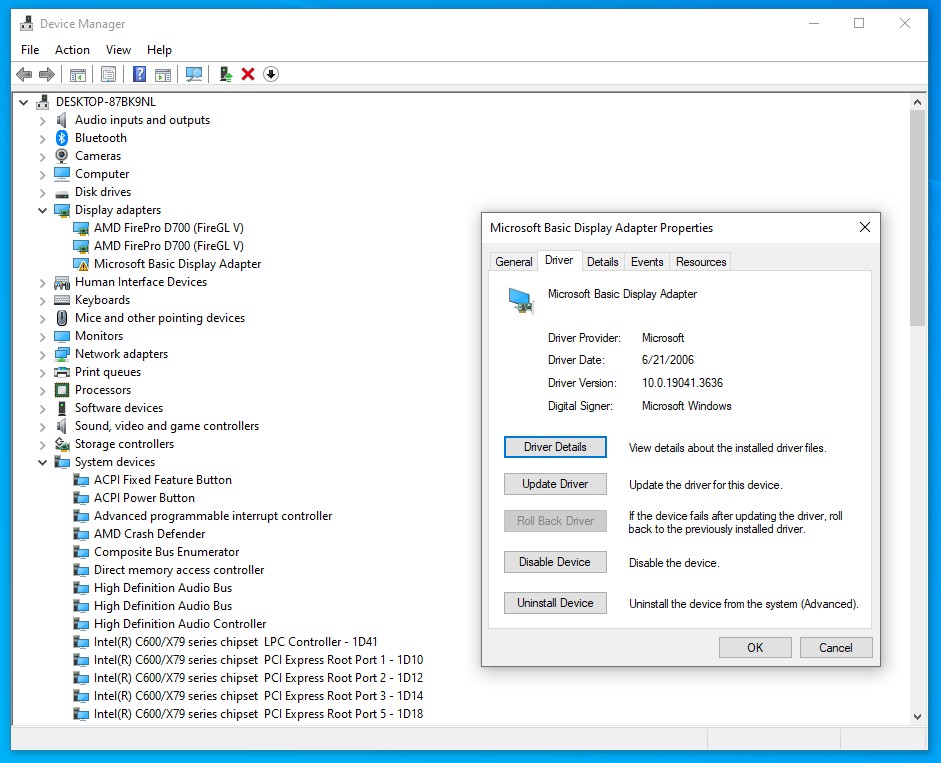
Step 5You will notice new hardware popup and your eGPU will be now visible as Microsoft Basic Display Adapter with warning sign.
In some cases it might install the drivers automatically which will change to name to proper graphics card name e.g. AMD Radeon RX 6800 XT, but there will be still a warning sign. |
 |
|
|
|
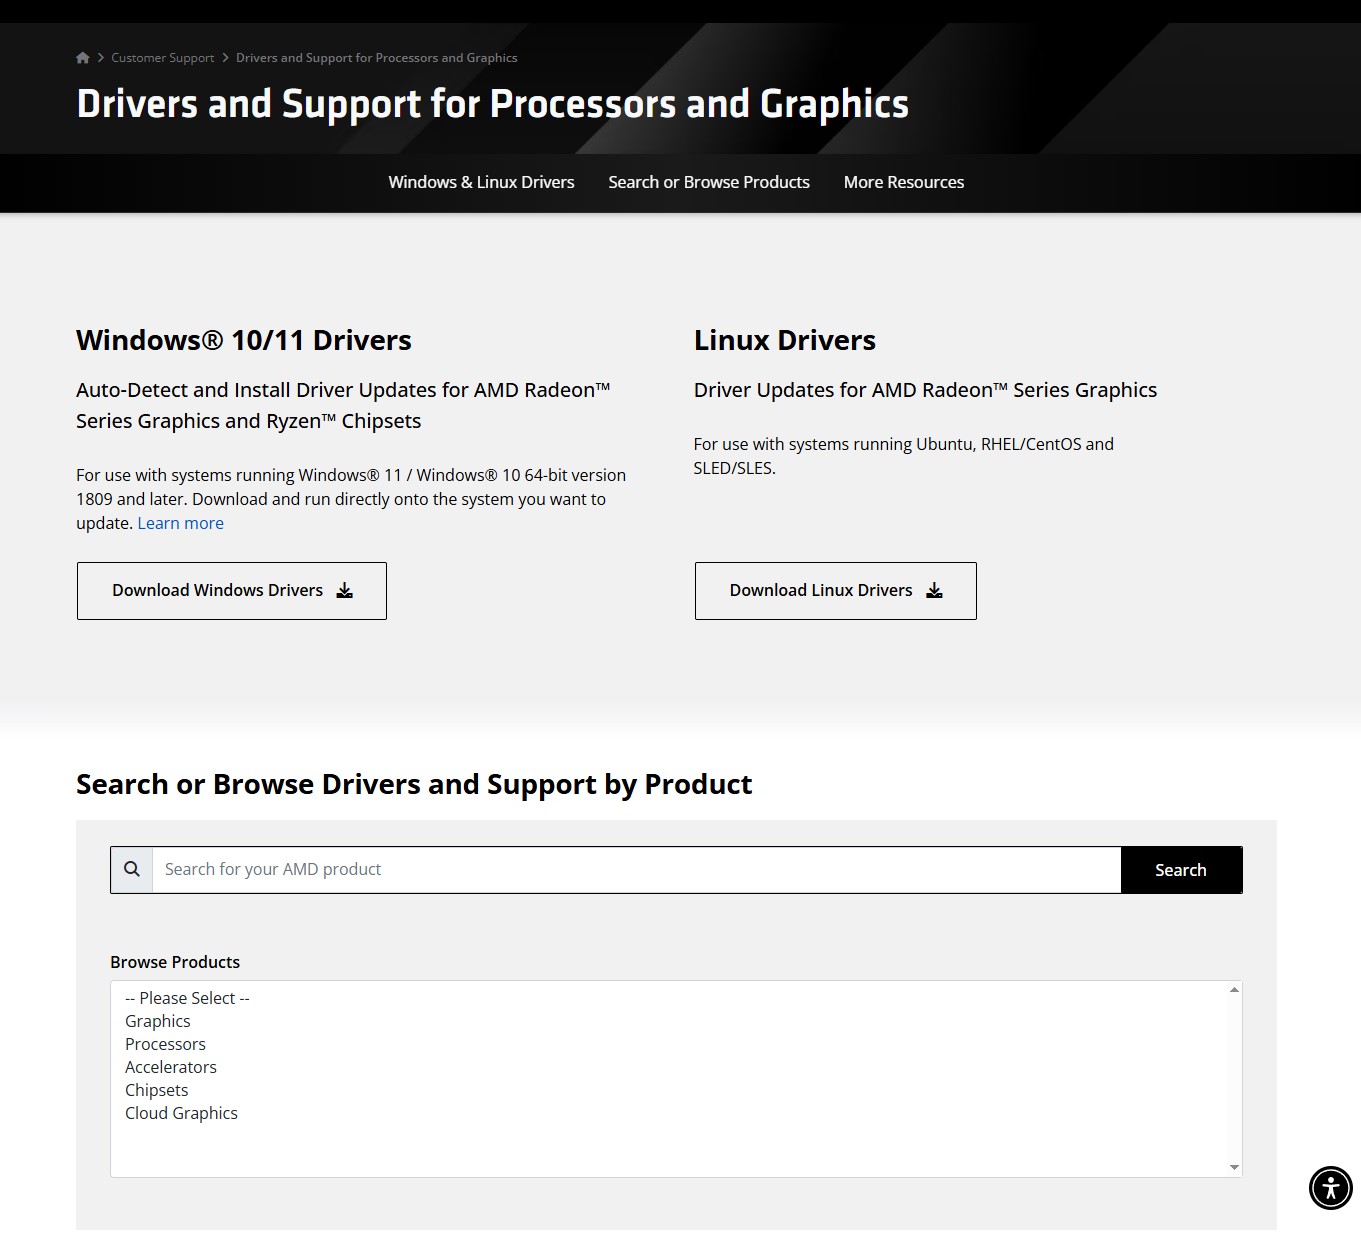
Step 6Open a following website in any web browser: https://www.amd.com/en/support/download/drivers.html to download the lastest AMD display driver for Windows 10. |
 |
|
|
|
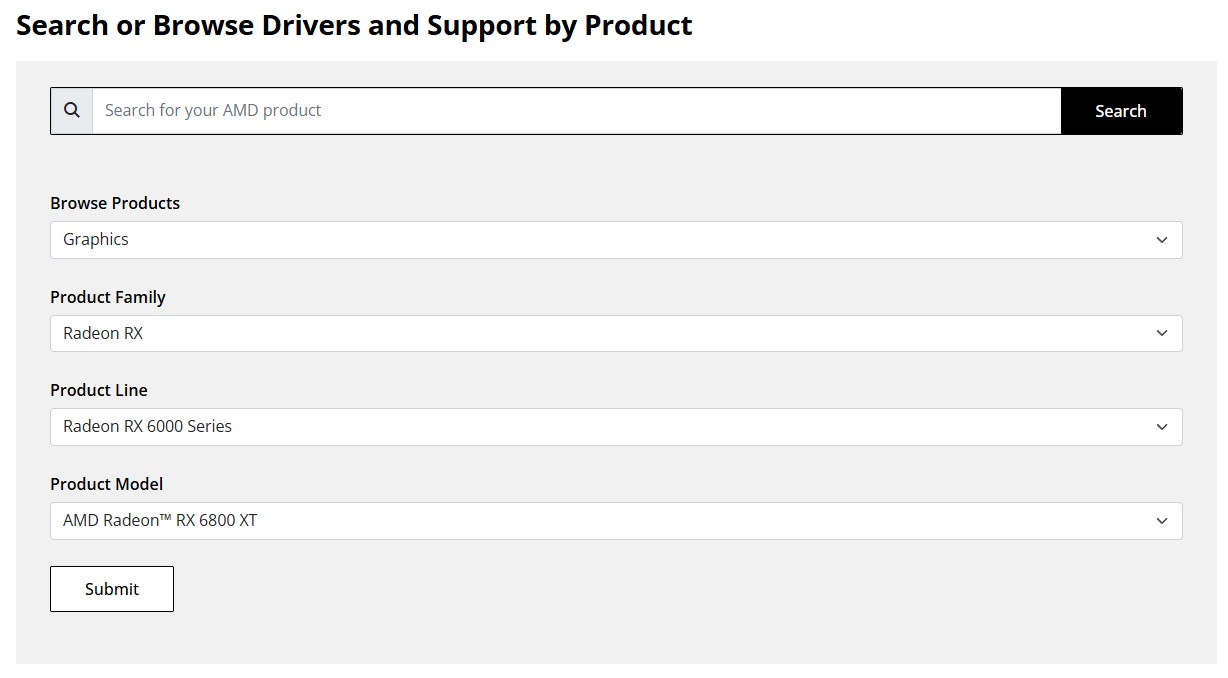
Step 7Choose your graphics card modele in Browse Products choose Graphics, then in Product Family choose e.g. Radeon RX, then in Product Line choose e.g. Radeon RX 6000 Series and finally Product Model e.g. AMD Radeon RX 6800 XT, then click Submit button. |
 |
|
|
|
Step 8Choose Windows 10 - 64-bit Edition. |
 |
|
|
|
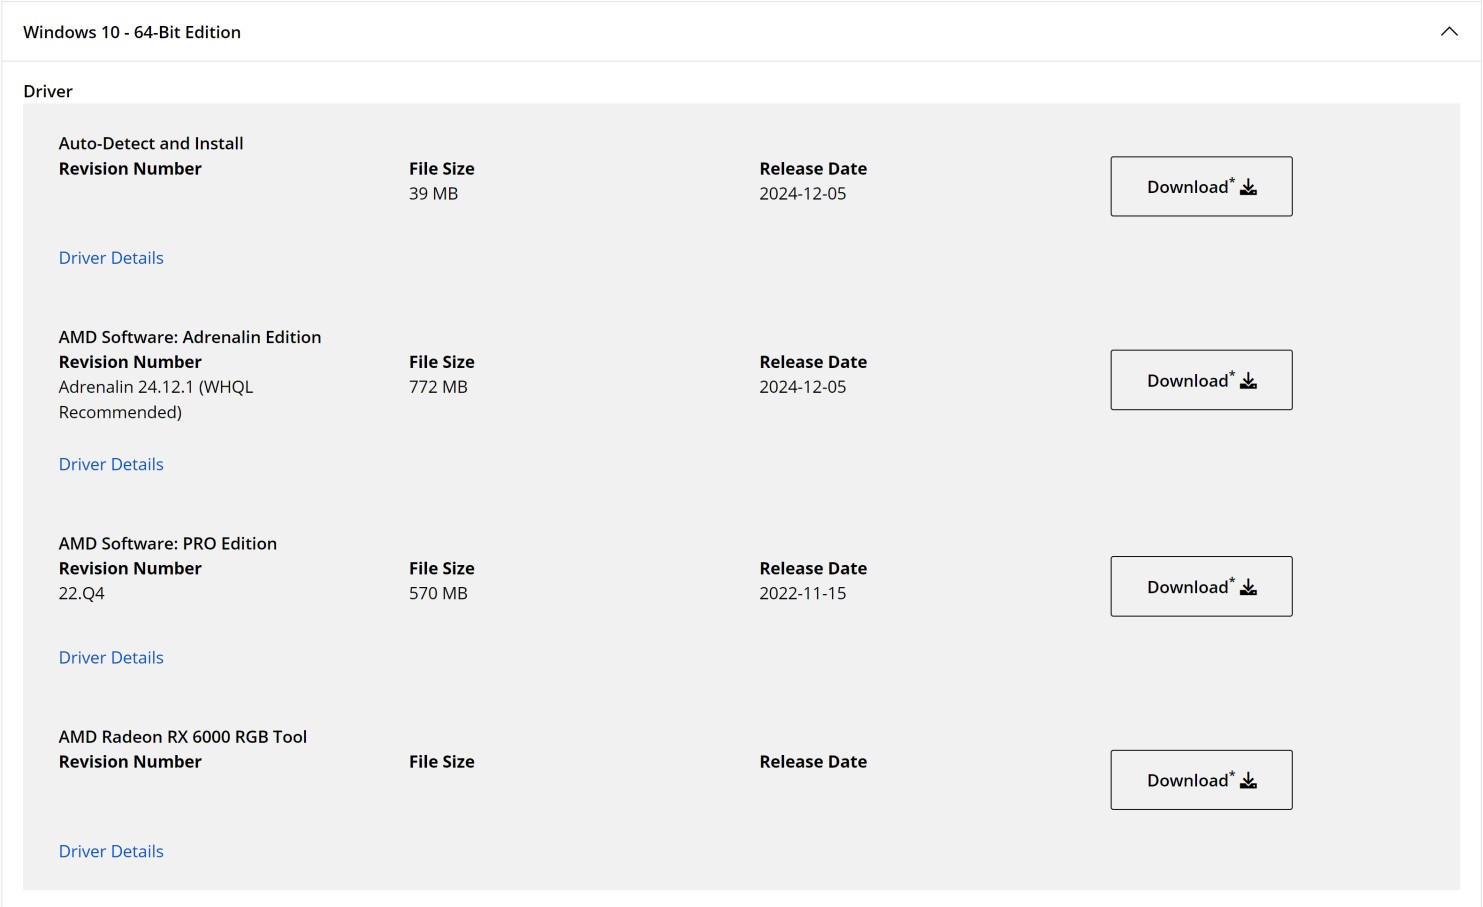
Step 9Choose either AMD Software: Adrenalin Editon or AMD Software: PRO Edition and click Download* button.
We recommend Adrenalin Editon as it's much newer and faster, but if you need excellent stability and use pro applications then use Pro Edition instead. |
 |
|
|
|
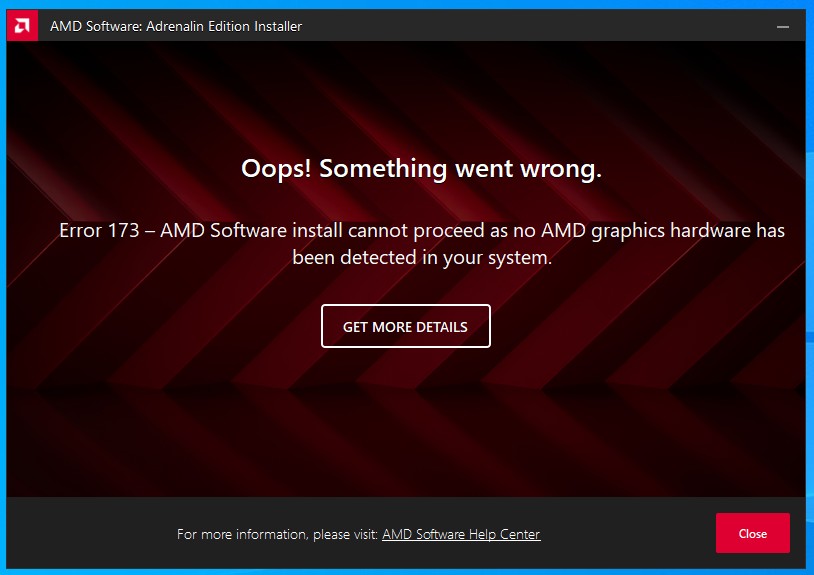
Step 10Run the downloaded driver to extract files, but you will notice an error right away that "No AMD graphics cards hardware has been detected by the system". Just click Close button. |
 |
|
|
|
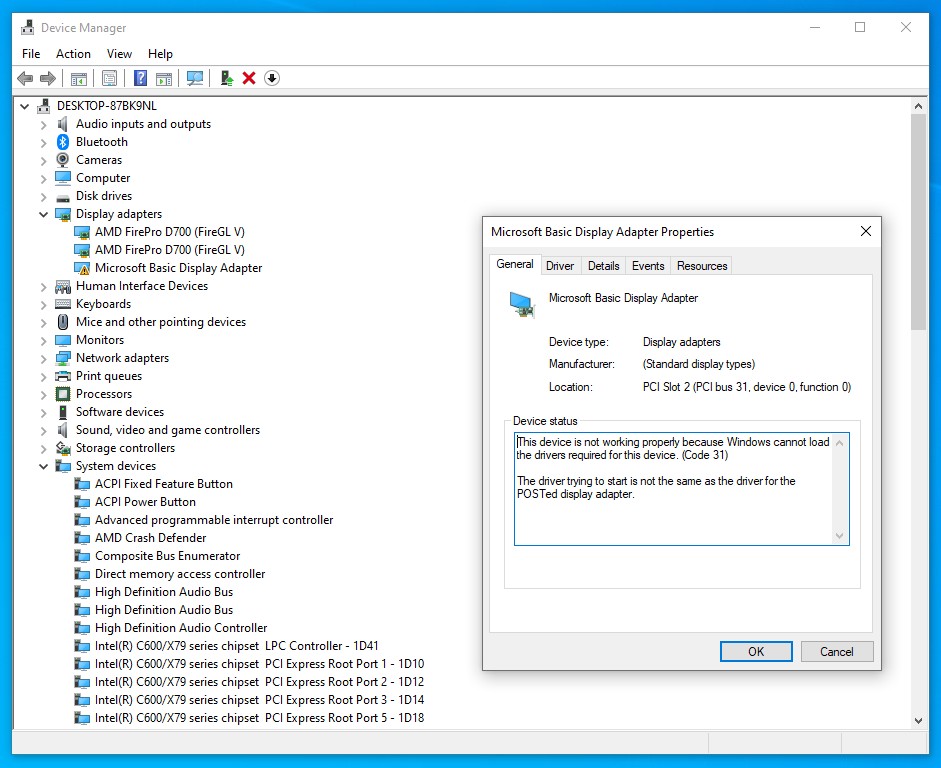
Step 11Go back to Device manager and double click Microsoft Basic Display Adapter or your eGPU name (if the drivers installed automatically). You will notice an error with Code 31. That's perfectly normal, because we've started with a driver for integrated graphics cards. |
 |
|
|
|
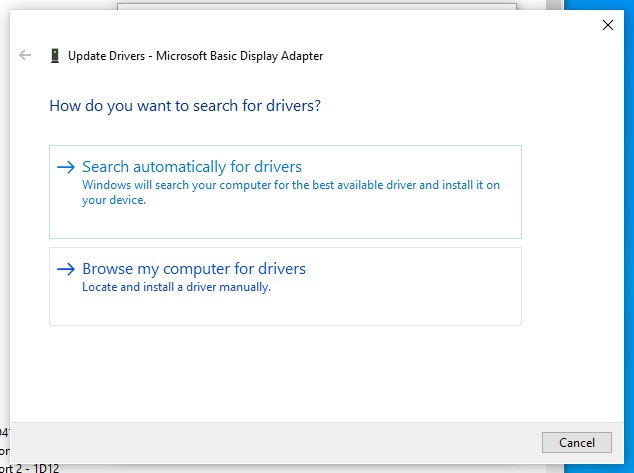
Step 12Click Driver tab and then Update driver button. |
 |
|
|
|
Step 13Choose Browse my computer for drivers option. |
 |
|
|
|
Step 14In the text field type C:\AMD and click Next button. |
 |
|
|
|
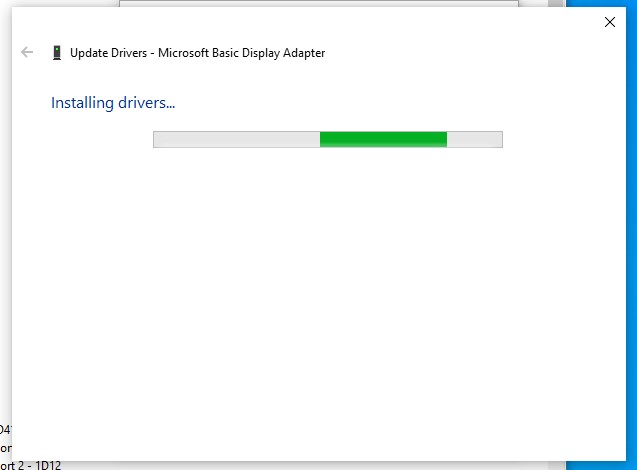
Step 15The proper driver will be automatically located and installed. |
 |
|
|
|
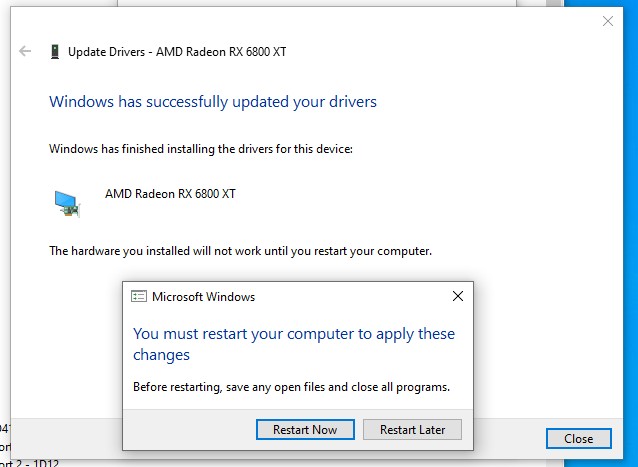
Step 16Driver installation has finished. Click Restart Now button to restart the computer. |
 |
|
|
|
Step 17Post restart you will notice that your eGPU is still having an Error with Code 12 which is basically not enough free resources. To make it fully working we need to disable two more PCI-to-PCI bridges. |
 |
|
|
|
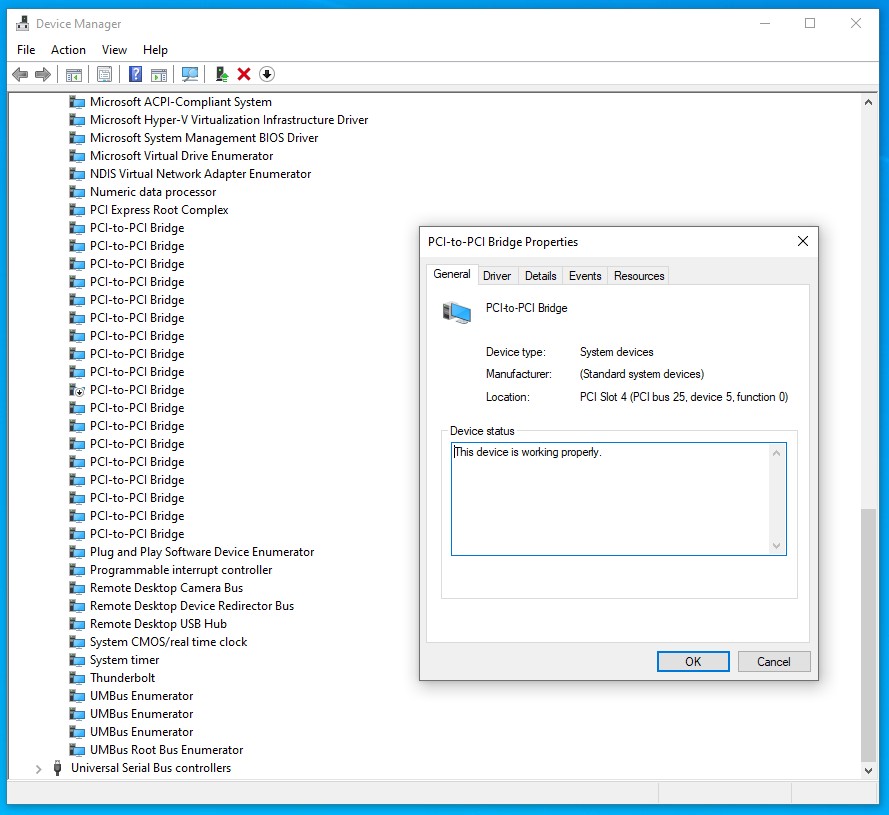
Step 18Scroll down to the bottom of the window and again double click on every PCI-to-PCI bridges and look for PCI-to-PCI Bridge with Location: PCI slot 4 (PCI bus 25, device 5, function 0). |
 |
|
|
|
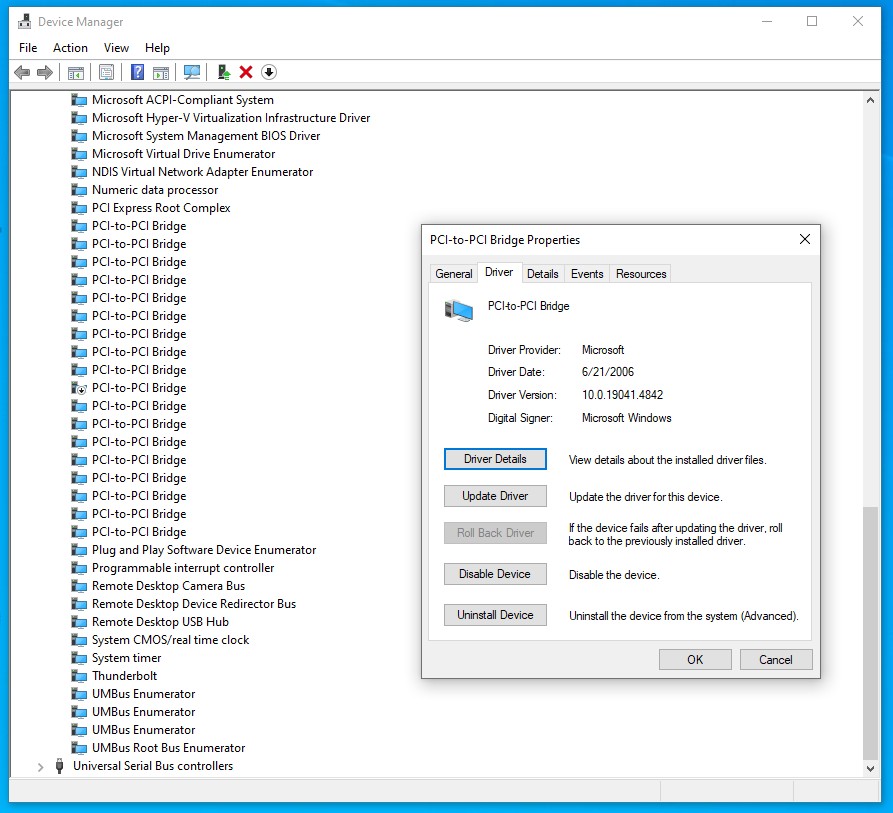
Step 19Click Driver tab and then Disable Device button to disable it. Click Yes button to confirm. |
 |
|
|
|
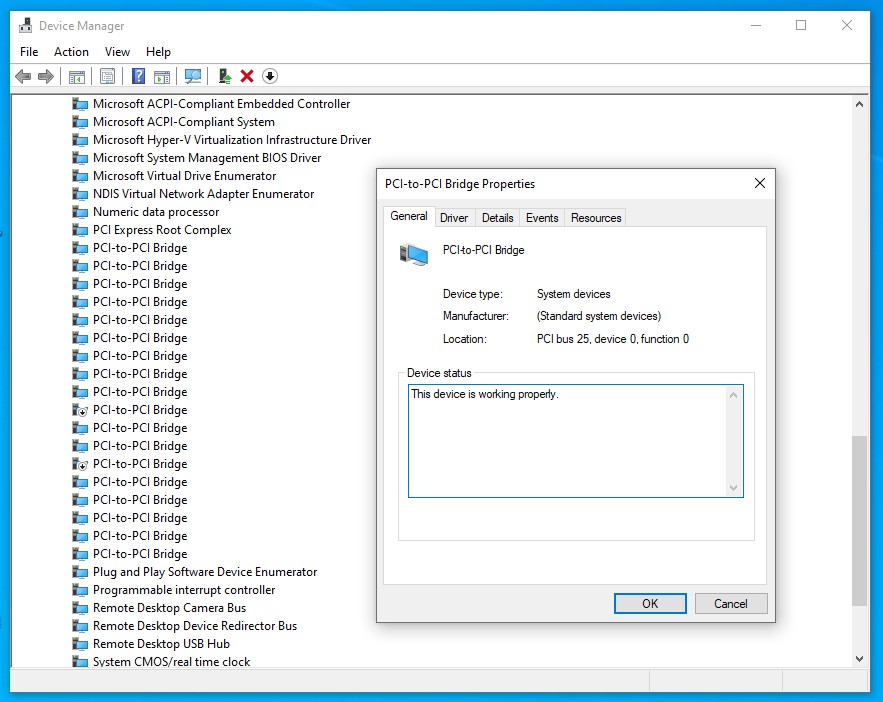
Step 20Now look for PCI-to-PCI Bridge with Location: PCI bus 25, device 0, function 0. |
 |
|
|
|
Step 21Click Driver tab and then Disable Device button to disable it. Click Yes button to confirm. |
 |
|
|
|
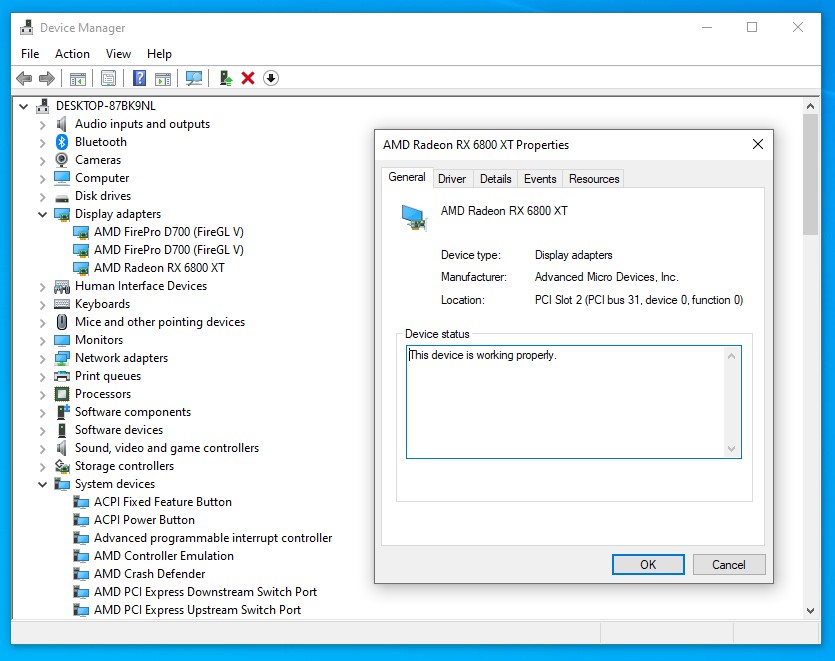
Step 22Now you can double click your eGPU name and it should be working properly. |
 |
|
|
|
Step 23Before you connect your display to eGPU we need to update AMD HDMI drivers.
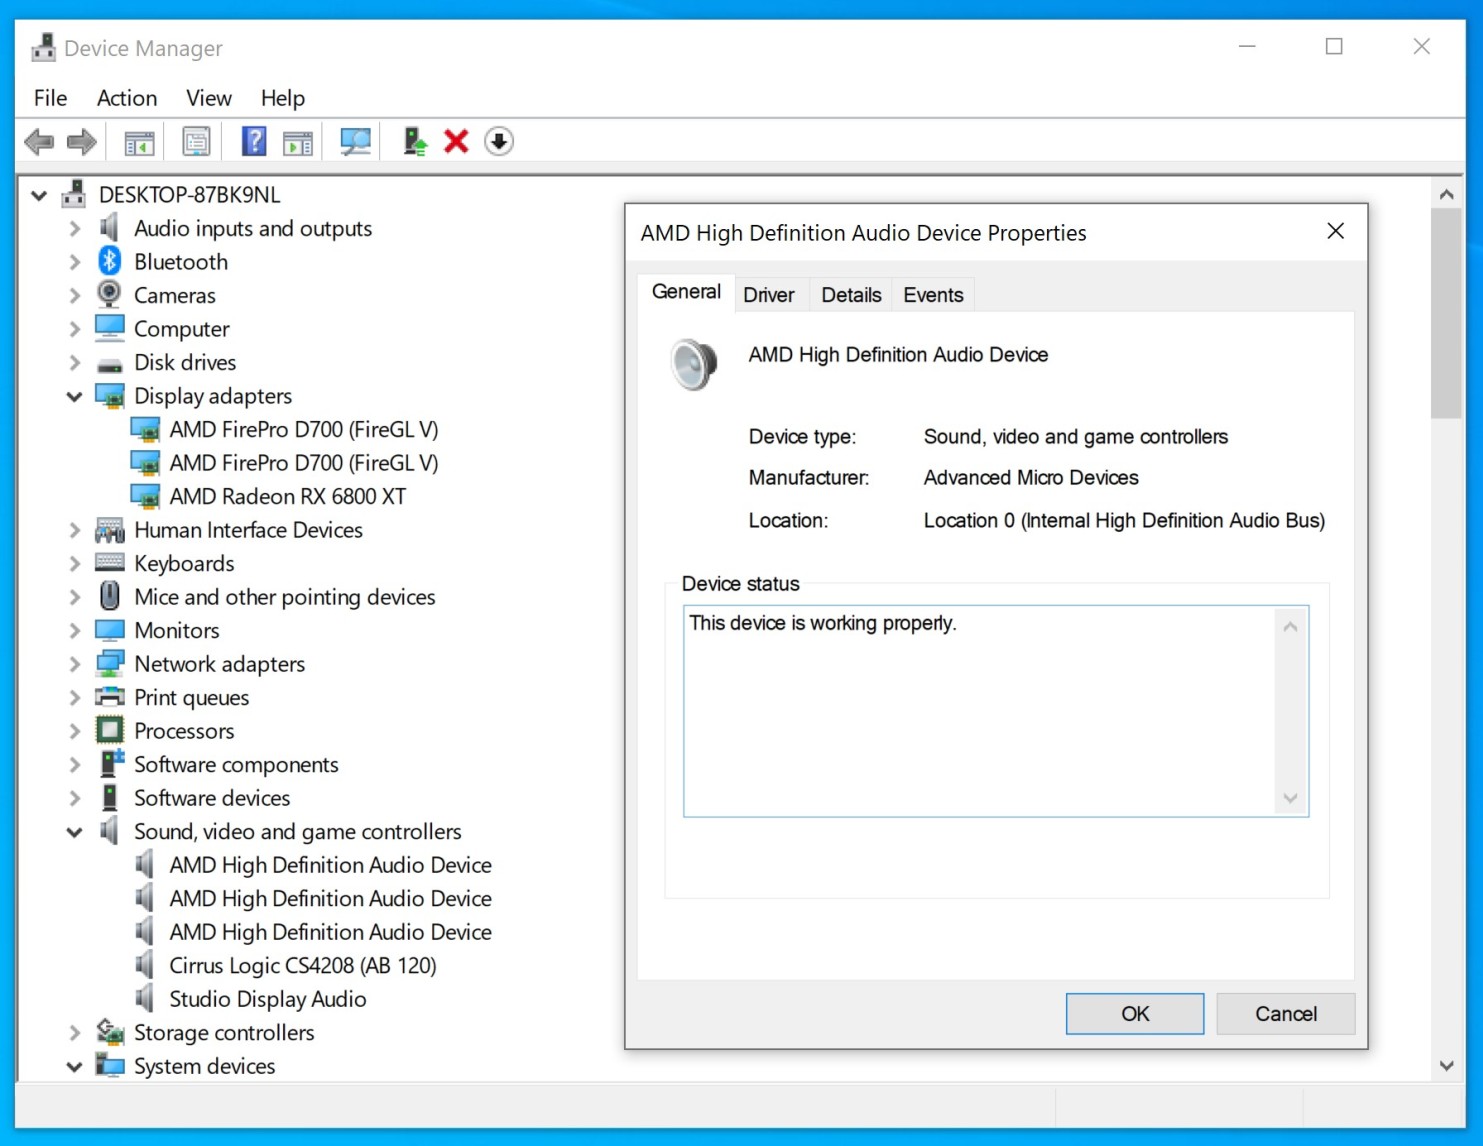
Expand Sound, video and game controllers section and double click first AMD High Definition Audio Device. |
 |
|
|
|
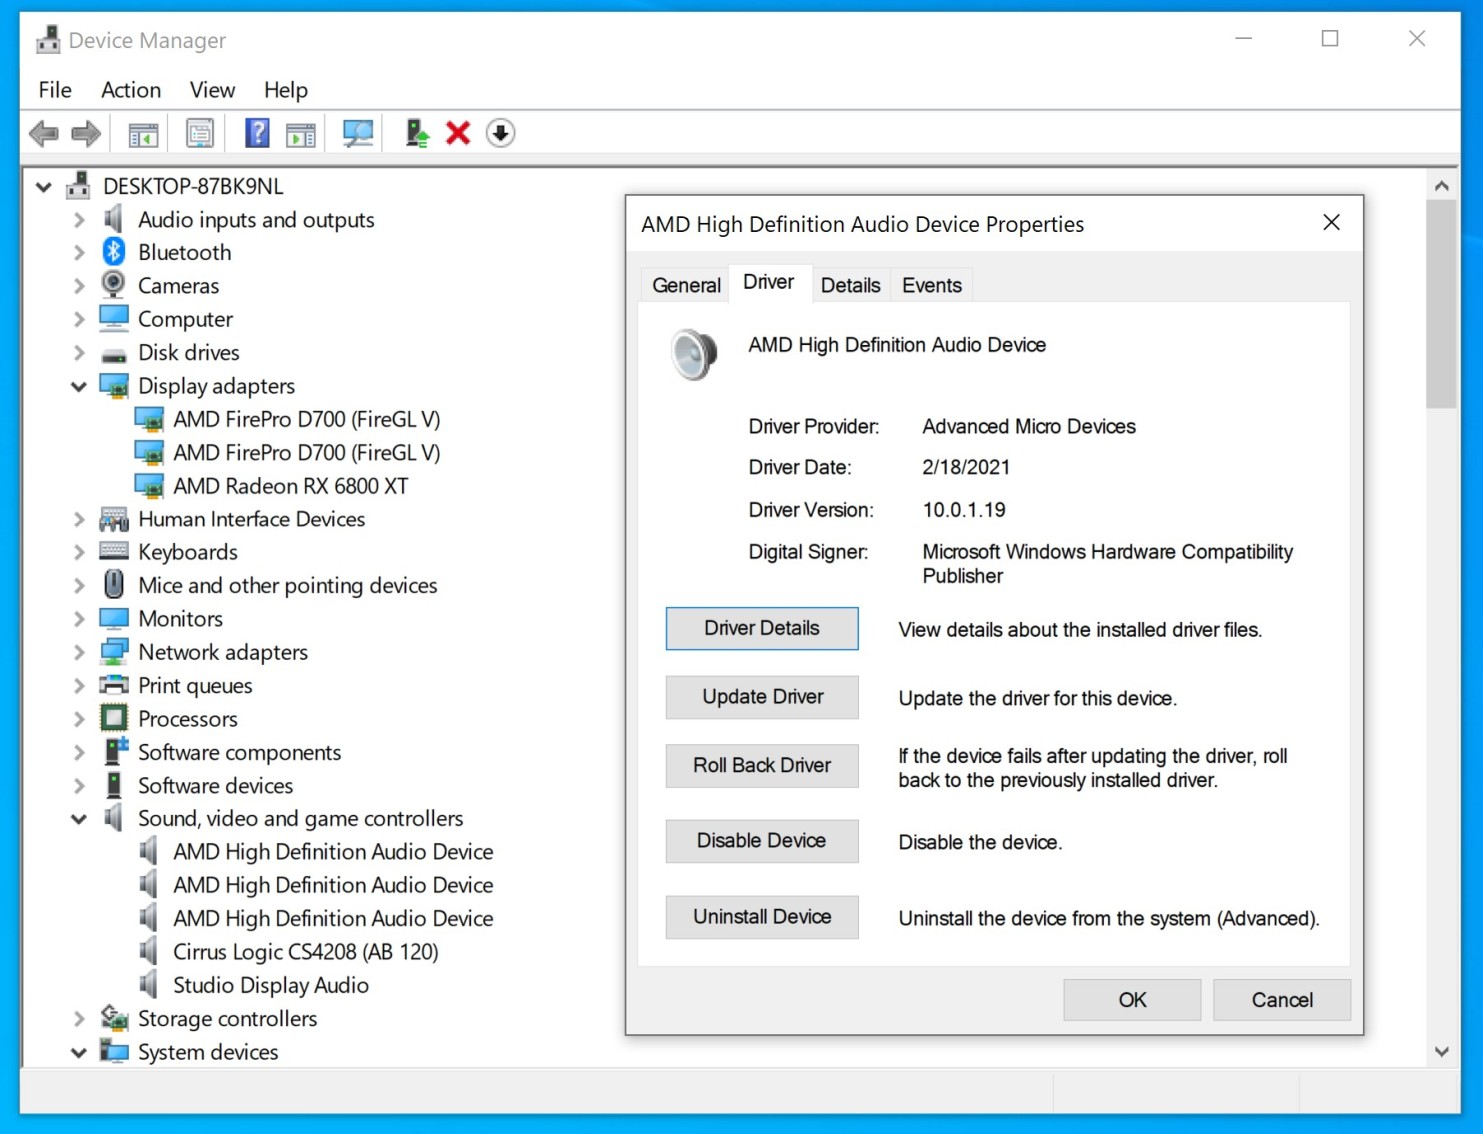
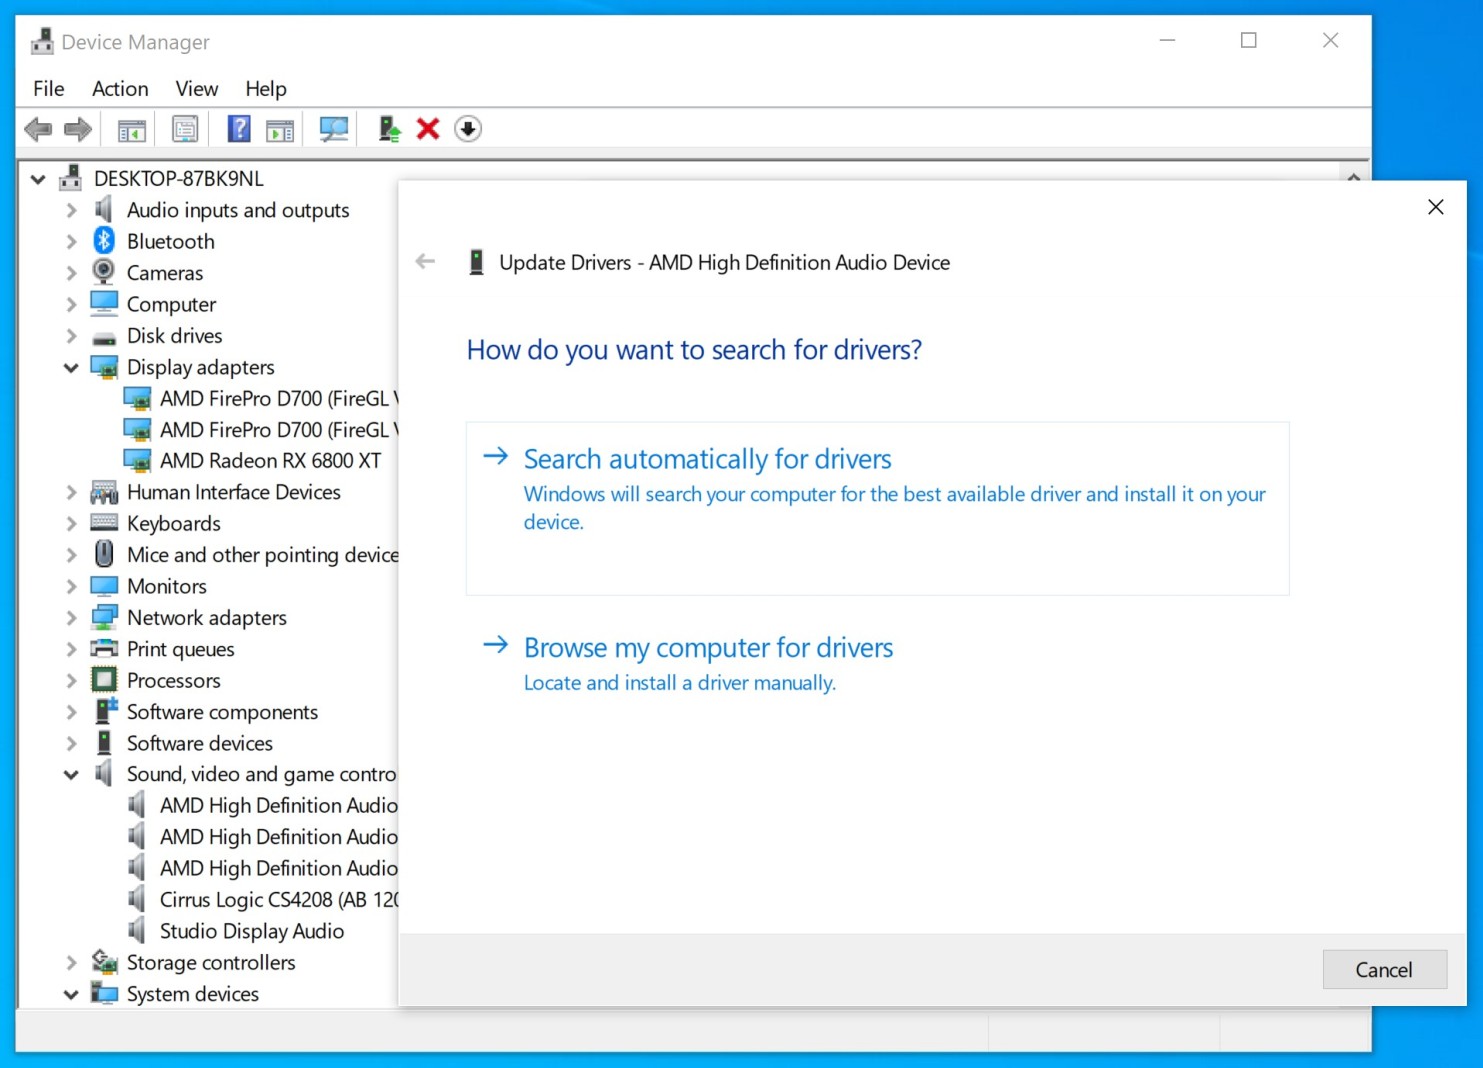
Step 24Click Driver tab and then click Update Driver button. |
 |
|
|
|
Step 25Choose Browse my computer for drivers option. |
 |
|
|
|
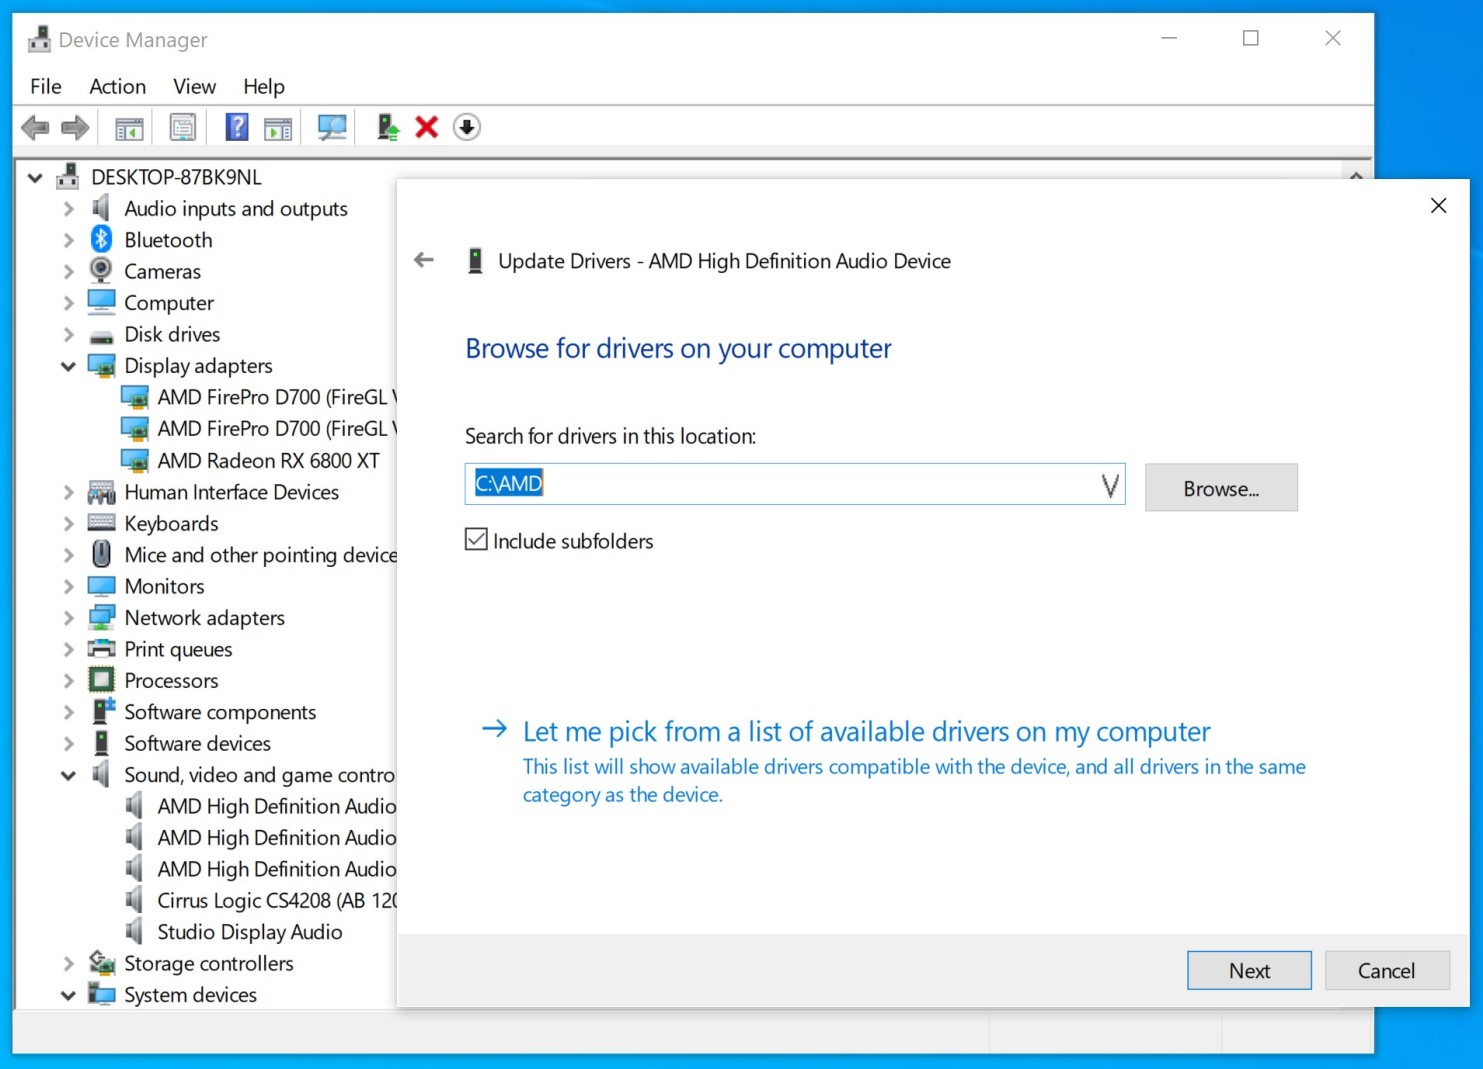
Step 26Make sure there is still C:\AMD path inside the text field, then click Next button to install the driver. |
 |
|
|
|
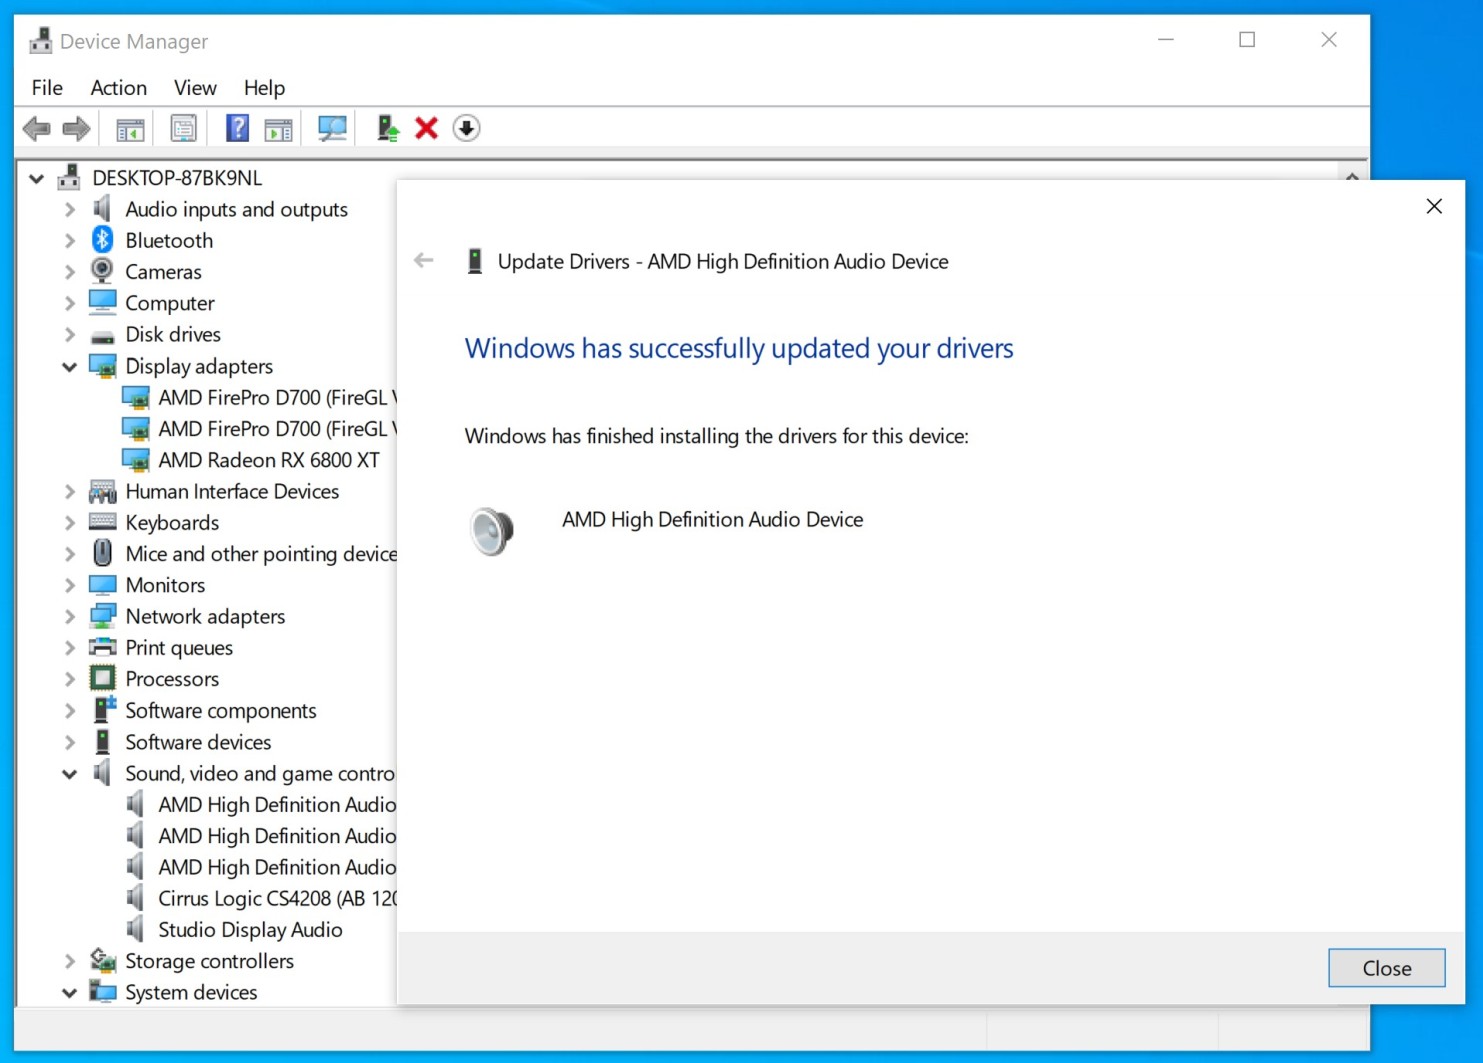
Step 27The driver should be installed successfully. Click Close button to finish the process. |
 |
|
|
|
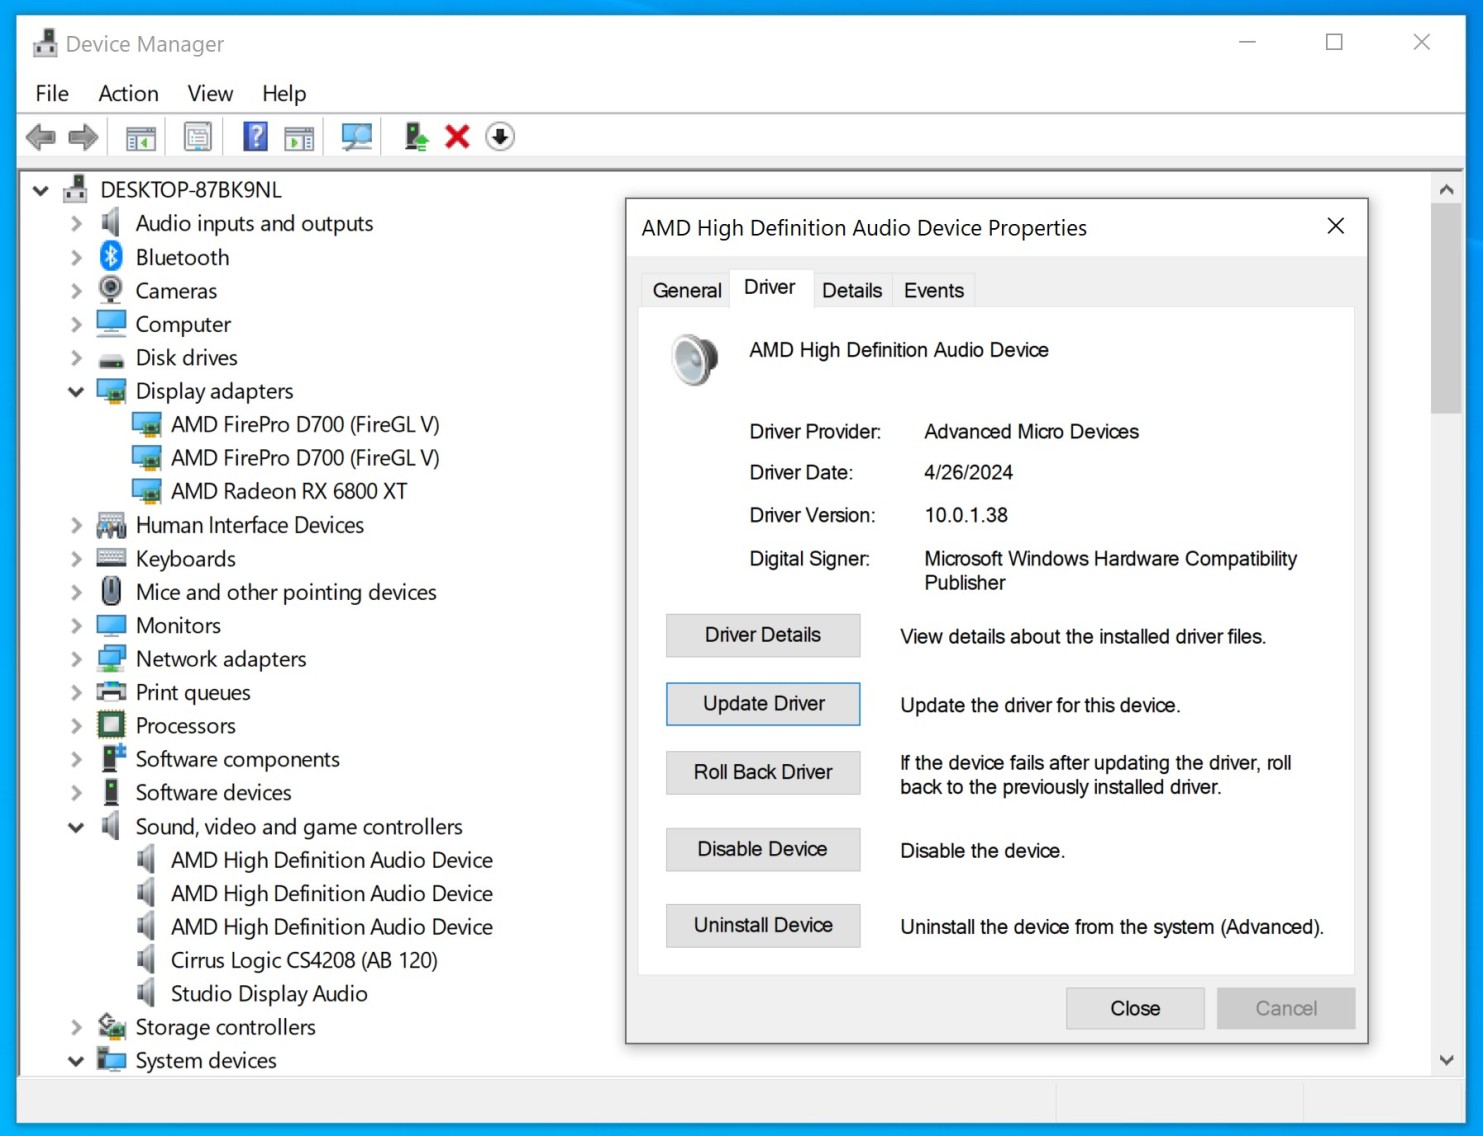
Step 28Repeat steps 23 to 26 for the remaining AMD High Definition Audio Devices. You will notice much newer driver date (newer than 2021). |
 |
|
|
|
Step 29Now it's finally time to reconnect your display from the integrated graphics cards HDMI to the eGPU (there is no need to turn off your computer to do this).
Remove the HDMI cable from the HDMI port and plug the display (or displays) to your eGPU. We recommend DisplayPort (or miniDisplayPort) depending on what type of ports does your eGPU have.
For Apple Studio Display use WJESOG DisplayPort to USB-C cable (should be ok for Apple Pro Display XDR as well). Connect the DisplayPort to the eGPU and also USB-A to any of the four USB ports inside Mac Pro 6,1 (2013).
Connect OWC NewerTech HDMI Headless 4K Display Emulator (or other brand) to the built-in HDMI inside Mac Pro 6,1 (2013). |
 |
|
|
|
Step 30First we need to prevent the system from using the emulator so the system would only use displays connected to the eGPU and set maximum possible resolution.
Start by right clicking and choosing Display settings from the context menu. |
 |
|
|
|
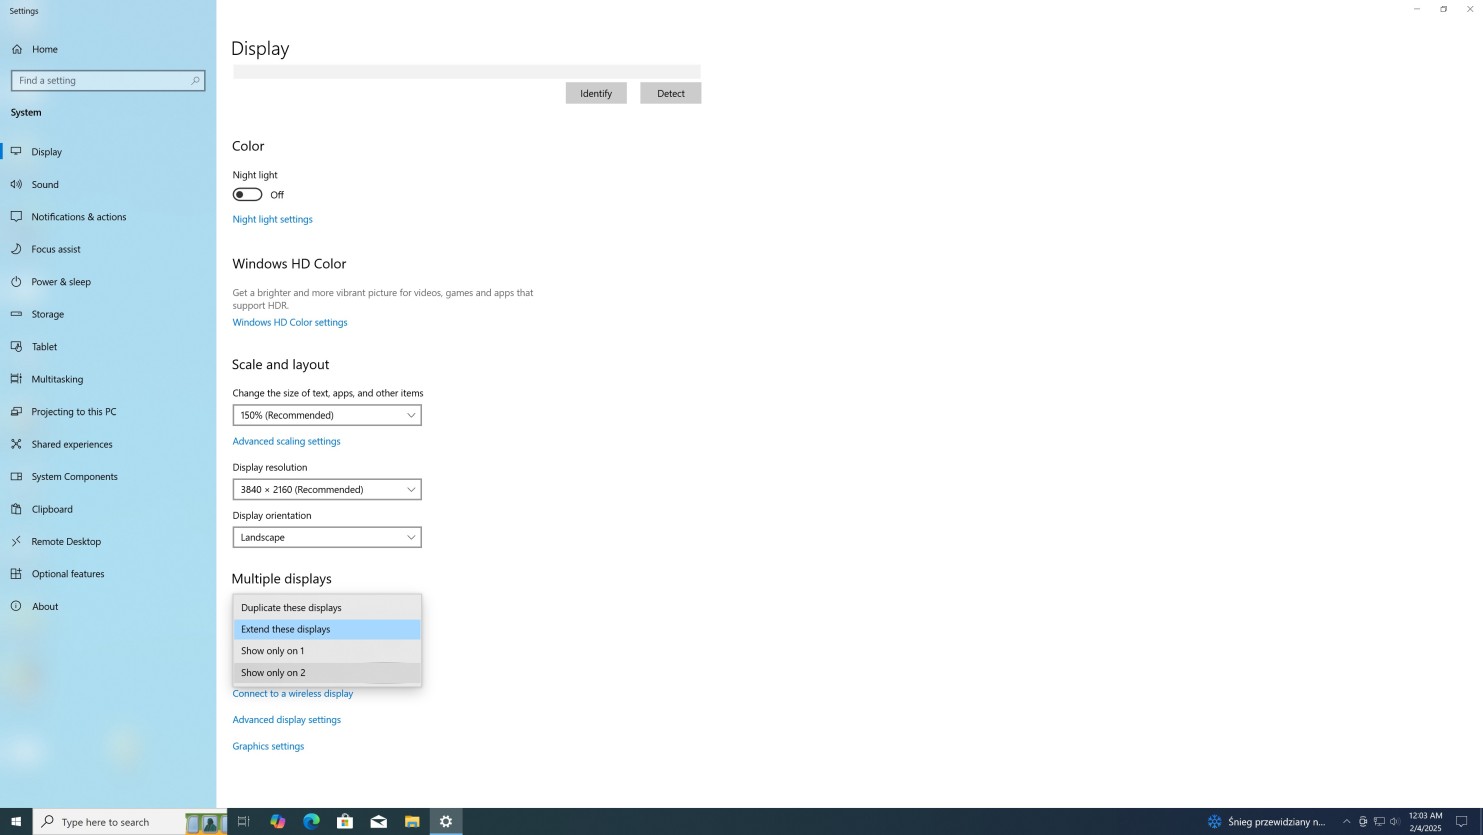
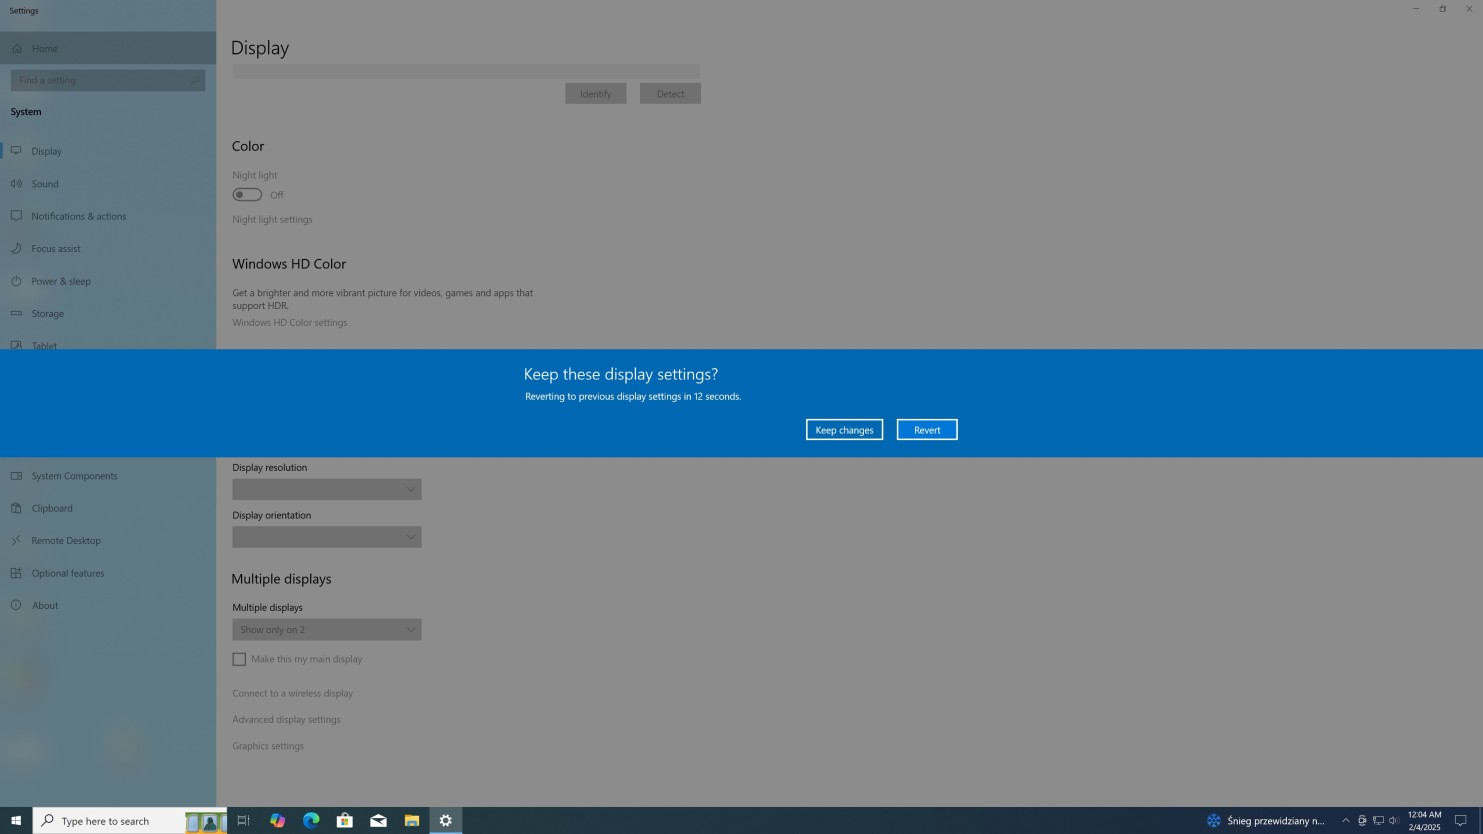
Step 31In Multiple displays section select Show only on 2 from dropdown list. |
 |
|
|
|
Step 32Click Keep changes button. |
 |
|
|
|
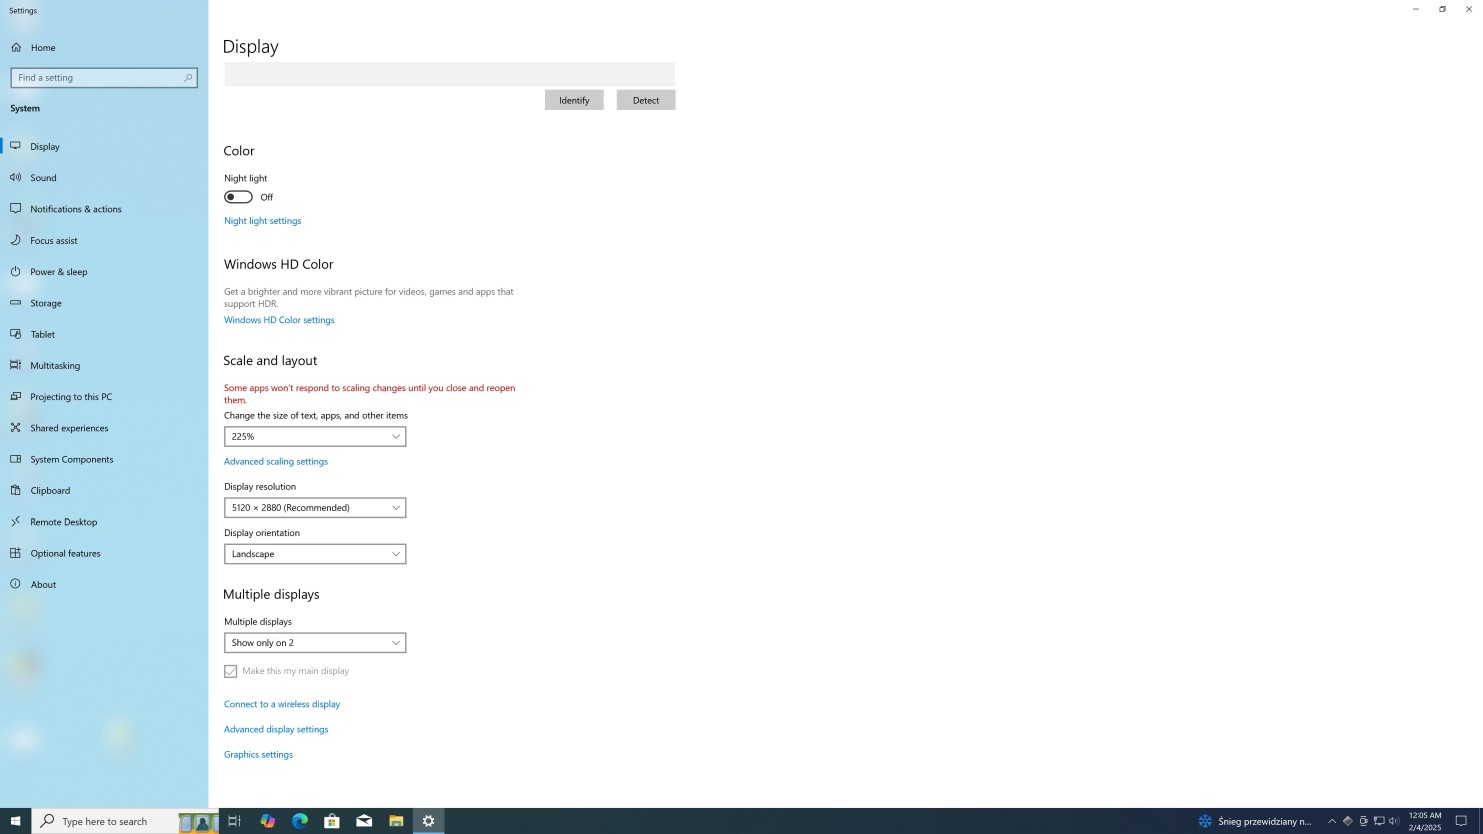
Step 33If you have Apple Studio Display in Display Resolution you will now be able to choose full 5K resolution 5120 x 2800 (Recommended).
This will give you full 5K@60Hz with 10-bit color. |
 |
|
|
|
Step 34Now you can change Scale and layout. By default the system is scaling to 225% on 5K displays. We recommend 250% for better comfort.
That's it. Your new eGPU is now fully working.
WARNING: When you start your system with OWC HDMI dummy display HDMI plug inside Mac Pro 6,1 (2013) there would be no Windows splash screen.
You will see something on screen right before desktop is loaded. It's because the computer is using the first (dummy) display to display Windows logo and there is no way to change this. The second display (the one connected to eGPU) is activated as soon the display driver is loaded.
If you have multiple Windows versions installed (or other OS like Linux) you will see Windows boot manager as always.
We recommend setting default startup disk to the BootCamp (Windows) partition.
Then if you need to boot to macOS you can either remove OWC HDMI dummy display plug and see normal Apple boot screen or you can choose an option Restart in macOS. |
 |